

If you've never done it before, there are a lot of tutorial videos you can watch, but honestly, I think some of them make the process look way harder than it needs to be. Especially if you're using stickers from my shop that are already formatted and ready to cut. Follow these steps to get your stickers made:
If you haven't ever used Print and Cut, or even if you have and it's just been awhile, you'll want to be sure to calibrate it before beginning. This will ensure that your cut lines match up with your stickers. If you use your Cricut regularly, you may be okay to skip this step. Even though I use mine all the time, I found that the cut marks were starting to be slightly "off". This will happen over time, so it's good to check it before cutting something you don't want to ruin and have to redo.
To find the calibration, in Design Space, click on the hamburger in the top right:
This will open up this dropdown menu where you will see calibration in the list:
I am not going to walk you through the calibration process, because Cricut does a great job with their instructions! Click on calibration and it will walk you through the process easily and it only takes a few minutes. You will need to be connected to your printer and your Cricut to complete it.
Once your calibration is done, you're ready to make the stickers!
You'll need to know where you've saved the files you downloaded from your purchase so you can upload them. Many times, I go to upload and then can't find them, which seems silly, I know. But it shows the importance of organizing files on your computer!
Start by clicking on 'New Project' and you will get a blank canvas like this. We need to start by uploading the sticker files:
Click on 'Upload Image' and this is where you'll need to find the files on your computer:
Once you've navigated to the correct folder, you'll want to select the PNGs. They are already formatted for Print and Cut. You'll have to upload them one at a time:
Now you're going to want to save this as a 'Complex' image. If you save it as a simple or moderately complex image, your stickers will be blurry.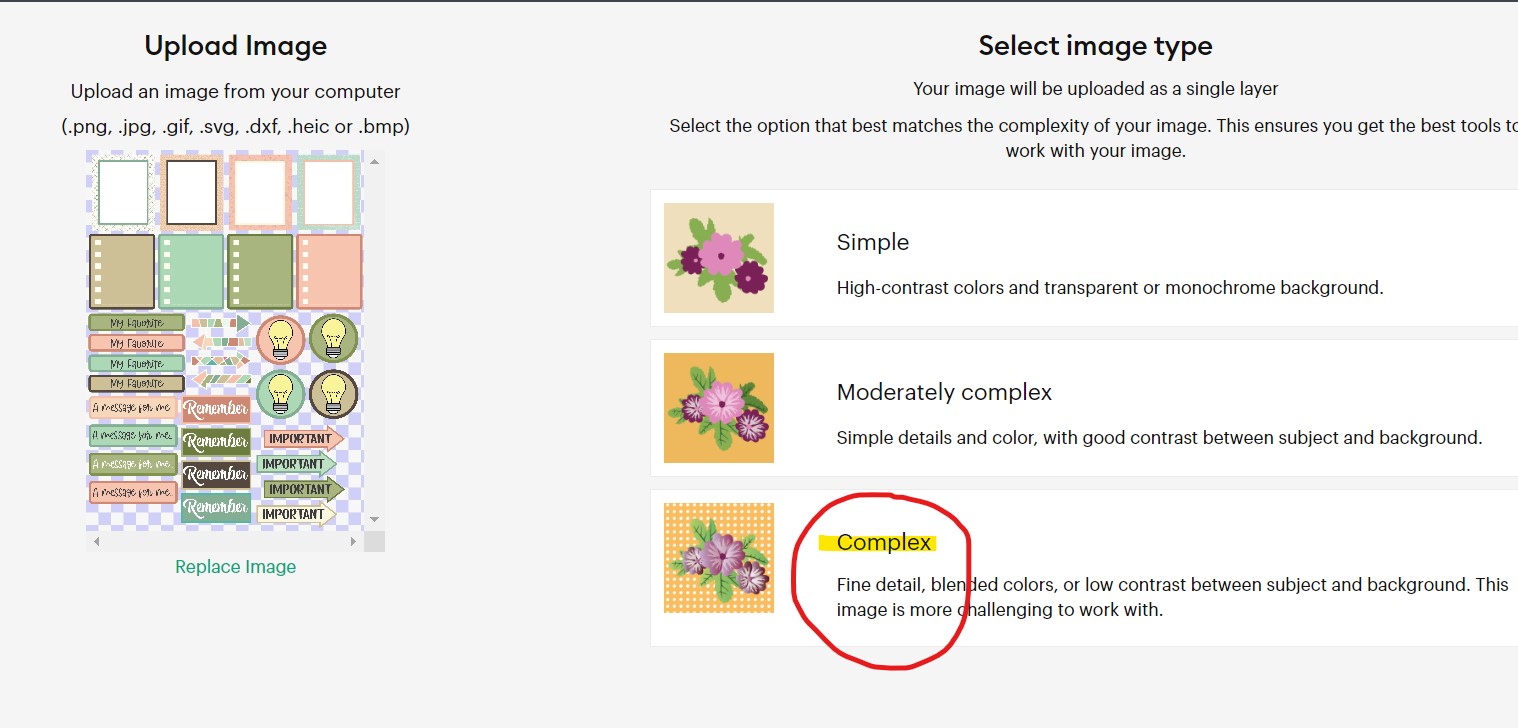
This is the next screen you'll see. Because my stickers are already formatted for Cricut and have a transparent background, you don't need to do anything here, just apply and continue:
When selecting the upload type choose the 'Print Then Cut Image'. You can give it a name and add tags if you want, but that is optional. If you have collections, you can add it to a collection also.
This is what it will look like when all the images have been uploaded. Click on whichever ones you want and then add it to the canvas:
The image that you upload is going to be too large for Print & Cut but no worries because the proportions are correct, so all you'll need to do is size it down a bit. Cricut's Print and Cut size is 6.75" by 9.25" so it has to be within that size. Both the width and the height need to be equal to or less than those numbers.
First, you'll notice off to the side there is a warning telling your your image is too large for print and cut! That will go away once we've change the size:
You can just drag the corner of the image to make it smaller, but I prefer to resize here to get it exact:
You'll notice in this picture the little lock is open. Be sure to click on it and close it before changing anything to keep the proportions correct:
Once the proportions are locked, you can go ahead and change the size of the image. Changing one will change both. Remember that your proportions have to be under 6.75" on one and 9.25" on the other. When I change this one using the 9.25" you'll notice that the image is still going to be slightly too big!
But when I change the other proportion to 6.75", now both sides are within the correct range. Now we're ready to print and cut!
You can add multiple sheets of stickers to your project and do them all at once, or do each sheet as it's own project--it's up to you. If you want to do them all at once, go back and upload the next sticker sheet and do this process again.
Now we're ready to make them. Make sure your machine is selected, and click on 'Make'.
This is the first screen you'll see. Your Cricut will need to be able to read the black lines around the outside edge in order to know where your image is, but the black lines on the inside around the actual stickers will not print, it just shows the edge of your image on the screen. Go ahead and click 'Continue".
On the next screen, you'll send your project to the printer. If you're doing more than one sticker sheet at a time, it will send each page to the printer one at a time. So when you click on 'Send to printer' this is just going to be the first sheet.
Select your printer and make sure the 'Add Bleed' button is turned on. Then print.
You may notice once the sheet is printed it may look a little wonky, like the stickers are overlapping, but they aren't. That is the bleed, and it just ensures that your stickers are completely encased in the cut.
Now load your printed sheet onto your mat, and you're ready to cut!
The type of material you choose in the settings to make stickers will depend on the type of stickers you want and also which type of machine you're using.
My sticker sheets are designed to be kiss-cut stickers, meaning the sticker sheet stays intact and you peel off each sticker as you use it. You can choose to cut them all out from the sheet if you want, but I don't recommend it, you'd have a million little stickers and they're hard to peel off the backing.
If you are making decal stickers (cut out of the paper completely) you want 'Sticker Paper--White'.
I love everything about using my Cricut, but the Print & Cut feature is one of my new favorites. I hope you love your new stickers!
Beware that not all sticker sellers format their stickers the same way I do, so these instructions might not work as well for other stickers you've purchased. Sometimes they don't have a transparent background, sometimes they come with an SVG layer you have to use, and sometimes you have to do some work removing your own background.